


Document Actions
gvSIG Mobile 0.3. User guide
The select and query tools provide a means of obtaining information about the various layers in the project.
To activate these tools, click the Information Tools button (1) on the main toolbar in order to display the secondary toolbar containing the Information functions.
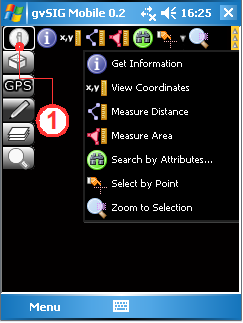
Information toolbar
Obtain information about a feature
This query tool is used to display information about features in the project's layers. Using the Get Information button (1), click on a point in the View to obtain information on the feature(s) at that position. This opens the Information by point form (2), which displays information on the features intersecting the point that was clicked. Note that the query button retains its active or inactive state until clicked again (clicking the button toggles between these two states). With the button in its active state the View can be queried multiple times. If the position queried contains no features then nothing will be displayed. If the layer being queried is a raster layer then the information will be displayed in the format shown in the figure below.

Querying a raster layer
However, if the queried position contains at least one vector layer with editable attributes, then a form is displayed. If the first layer intersected by the query point has a personal form, then this is the form that is displayed. If the layer is not editable, the information displayed in the form cannot be changed and is displayed in a grey colour (3). However, if the layer is editable, then the fields in the form can be edited and will be displayed in black (4). The figure below gives examples of the same information displayed in both a Standard Form (5) and a Personal Form (6). Note that this figure illustrates the forms displayed when the Get Information tool is used to query a vector layer.
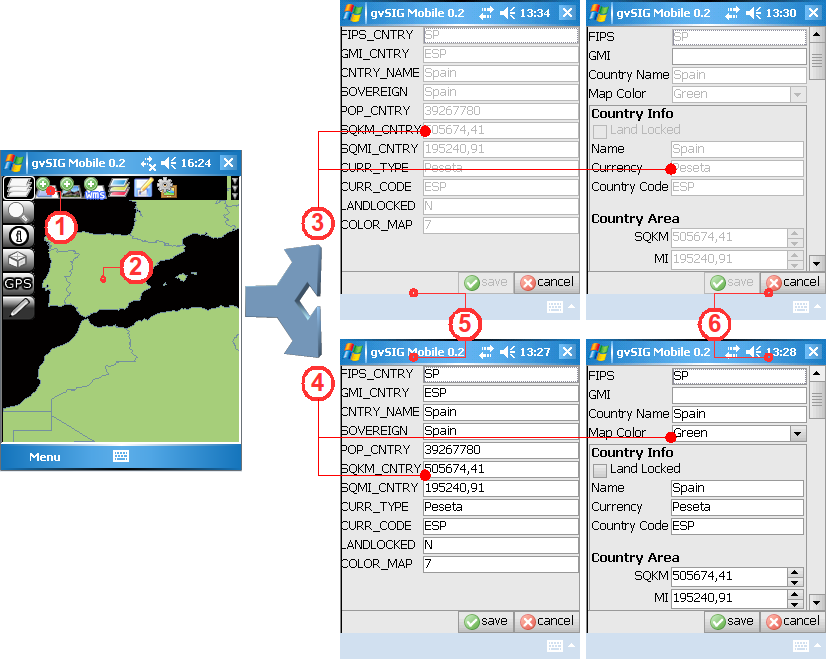
Four different formats for displaying information about a queried vector feature
NOTE:
The information displayed by gvSIG Mobile Pilot version 0.2 when vector layers are queried depends on the following:
- When clicking on the view, the information (if any) that is displayed corresponds to the feature intersecting the point that was clicked.
- The order of the layers influences the information that is displayed.
- Geometry is only shown for the uppermost layer that intersects the query point.
- Information is not displayed for other features intersecting the query point (The previous version of gvSIG Mobile did look at features from layers lower down in the View's layer order).
- To obtain information about features in lower layers obscured by upper layers it is necessary to either change the layer order in the Table of contents, or to disable the Infoable checkboxes of the upper layers.
The Editing Layers section provides more information about Vector Forms, while Appendix B explains how to create Personal Forms.
View coordinates
The View Coordinates tool (1) displays the coordinates of points clicked in the View. These coordinates are displayed in the status bar (2) at the bottom of the View. This tool remains active until deselected, allowing multiple coordinate queries to be made.
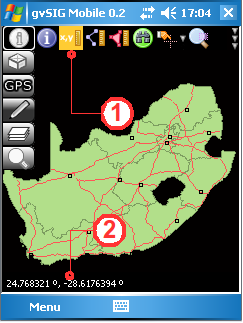
Displaying the coordinates of a point clicked in the View
Measure Distance
This tool is used to measure distances on the map. Once the tool is activated by pressing the Measure Distance button (1), distances between points clicked in the View are displayed in the status bar. Clicking a series of points defines a polyline, and the status bar displays both the total distance (2) of the polyline and the length of the last segment (3). The Measure Distance button remains active once selected, allowing repeated distance measurements to be made and the results displayed in the status bar. To deactivate the tool click the Measure Distance button again.
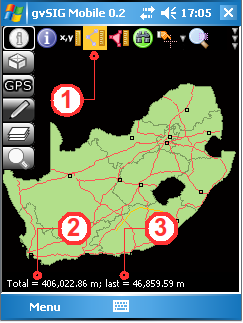
Measuring distances
Measure area
This tool is used to measure areas on the map. Activate the tool by clicking the Measure Area button (1) and then in the View click the vertices of the polygon to be measured. The area of the polygon (2) will be displayed in the status bar at the bottom of the screen. Like the Measure Distance tool, the Measure Area tool also has an active and an inactive state. Once activated it will remain active allowing area measurements to made until the tool is deactivated by clicking on it again.
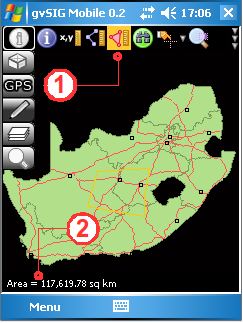
Measuring areas
Search by Attributes
This feature queries the attributes of a vector layer in order to locate records meeting certain criteria. Clicking the Search by Attributes... button (1) opens the Search by attribute value form, which contains the following fields:
- Layer. Select the layer to query from the list of layers in the project.
- Column. Select the attribute column in which to conduct the search.
- Op. Select the query operator.
- Value. Enter the value to search for in the selected attribute column.
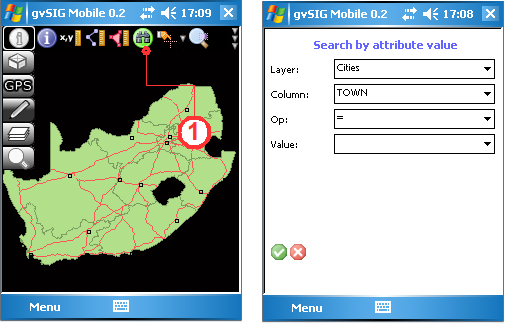
Search the attributes in a layer
Select features
This tool is used to select geometries (1) in a vector layer. When using this tool, only one vector layer must be marked selectable (infoable) in the Table of Contents.
- Select by point. (2) Select a geometry (feature) by clicking on it in the View. The selected geometry will be highlighted in yellow.
- Select by rectangle. (3) Select a set of geometries by drawing a selection rectangle in the View. Geometries wholly or partially within the selection rectangle will be selected. The selected geometries will be highlighted in yellow.
- Clear selection. (4) Deselect all geometries and restore their original colour.
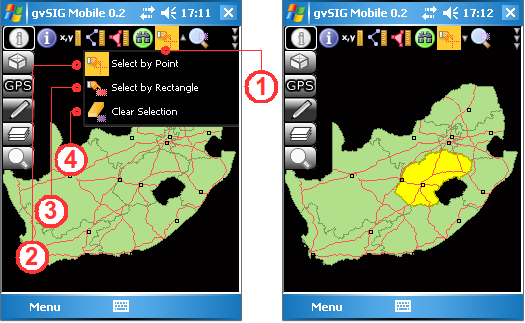
Selecting features in a vector layer


